
FKC-I air biological sampler Manual
INDEX
III. Main features and parameters. 2
IV: Structural features explanation. 3
VI. Maintenance and matters needing attention 8
VII. Regular failure treatment 10
I. Principle introduction
FKC-I air biological sampler is a kind of highly effective air biological sampler with multi-hole. It is designed according to the principle of particle bombardment and isokinetic sampling, directly sampling, keeping wind speed of sampling and that of clean room consistent basically, and reflecting consistence of animalcule in clean room more truly. When sampling, air with puffball will be bumped on agar surface of substrate utensil through the tiny hole; these animalcules grow quickly in the course of substrate, thus, the result will be got quickly.
II. Using environment
- Temperature: 10–35℃
- Relative humidity: 10–90﹪RH
- Atmospheric pressure: 80-110kPa
- Maximum dust content: 100000000 / m³@0.5µm or 0.2mg/m³
- Maximum wind speed: 1m/s
III. Main features and parameters
- Sampling hole has many small holes to reduce puffball superposition and reduce error of animalcule count.
- Sampling flow: 100L/min.
- Flow speed of the sampling port: 0.38m/s.Basically the same as the wind speed of the clean room (constant speed sampling).
- The sampling quantity could be set from 0.01-2.0m3.
- Use the standard and universal culture dishΦ90*15mm.
- Power supply: AC/DC. Built-in battery DC7.4V, 6400mAH. Continuous 8 hours working time after charge.
- Size of appearance: Φ120*300 。
- Weight: 2kg
IV: Structural features explanation
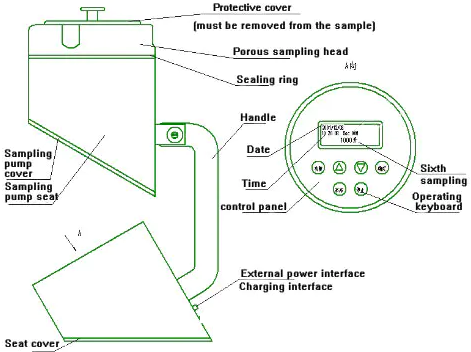
- The sampler is composed by upside and downside two parts. The upside includes the sampling head, culture dish pedestal, sampling pump, sampling pump pedestal and sampling pump power supply. The downside includes the control panel, memorizer, LCD monitor, keyboard, battery package, please refer to the picture.
- The sampler could be used with AC/DC. There is a switch and jack at the back bottom of the instrument (see the picture). When the DC is to be used for the instrument, set the power on for the battery supply; when using the AC, plug in the equipped 16.8V DC power supply to the jack. When the switch is on, it’s under the status of charge; when the switch is off, the 16.8V power supply works and maintains the status of charge.
V. FKC-I Operation instruction
- Discharge the multi-hole sampling head, place the culture dish holding the culture medium with the diameter of Φ90mm to the dish pedestal and adjust the dish to the horizontal level. Adjust the locating rod to make the reticle at the same level as that of the culture medium and install the multi-hole sampling head.
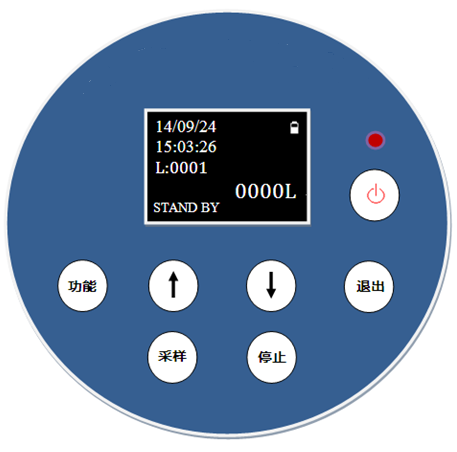
- Switch on the electric power source and the screen displays the previous sampling data and time. Press the “Stop” key ,then Press the Up and Down key to check the historical data in the memory. Press the “Stop” key to make the system enter the “sampling ready status”. Then the current date and time are displayed and the sampling value is displayed as Zero.
- Removing the “Protective cover”.
- Press the “Sample” key system to enter the Sampling Status and start the sampling pump and counter according to the deferred time. Now the sampling quantity gradually accumulates to the set value, the counting stops automatically, close the sampling pump and store the current sampling quantity, time and date in the internal memory.
- Under the sampling status, press “Stop” key to top the sampling work, close the sampling pump, stop the accumulation of the sampling quantity, press “Stop” key again to clean the current display and enter the sampling ready status.
- Press “Function” key to enter the parameter setting status and the setting of the parameter is as follows:
- Setting of sampling quantity: press “Up” and “Down” key under this status to adjust the sampling quantity, the range of which are 1-1000 liter and the adjustment pace is 1 liter. Press “Stop” key to enter the parameter setting.
- Setting of sampling Delay time: press “Up” and “Down” key under this status to adjust the Delay time; the range of which is 0-9000 seconds and the adjustment pace is 1 second. Press “Stop” key to enter the parameter setting.
- Setting of backlight delay time: press “Up” and “Down” key under this status to adjust the backlight deferred time; the range of which is 0-999 seconds and the adjustment pace is 1 second. Press “Stop” key to enter the parameter setting.
- Time setting: under this status, press “Up” and “Down” key to adjust the time where the cursor is located. Press “Enter” to change the position of the cursor and “Stop” key to quit the parameter setting.
- Date setting: under this status, press “Up” and “Down” key to adjust the date where the cursor is located. Press “Enter” to change the position of the cursor and “Stop” key to exit the parameter setting.
- Adjust: XXX “is a parameter used to adjust the fan speed (pre-set at the factory, for calibration purposes only, customers are not allowed to make unauthorized changes)
- Clear Data: 000 “means to delete data. At this time, set it to” 555 “and press the” Function “key to delete all historical data
Note: FKC-1 instrument has no serial communication and serial printing function.
VI. Maintenance and attention
- It’s not allowed to draw the poisonous and erosive gas and use it in severe acid and alkali environment; nor is it allowed to be used in the environment with the powder density larger than 0.3mg/m³.
- It’s not allowed to press the “sample” key when the “Protective Cover” is not discharged.
- There is a power indication on the screen which can be divided into three steps: full of battery, 2/3 power and 1/3 power. When the screen displays the 1/3 power left, this shows the power is insufficient and you’d better charge it for continuous use. Otherwise it may lead that there is no power before a period is finished.
- When installing the culture dish, it must be in place and be fastened and adjust eh dish to the horizontal level.
- The culture dish must be adjusted to the horizontal level; adjust the locating rob to make the reticle on which at the same plane of the culture medium.
- After each use, use the alcohol to wipe the “sampling head” and “protective cover” clean and cover the “protective cover” on the “sampling head”.
- When the instrument is not used for long time, it shall be put in the packing chest and it shall be used at least once a month and no less than 10 minutes once.
VII. Regular malfunction treatment
| Regular failure | Reason | Treatment |
| Switch on the power and the screen doesn’t work | 1. The battery does not have electricity | 1. Plug the 16.8V DC power source accompanied with the packing box and charge |
| Press the “start” key and the sampling pump doesn’t work | 1. The lead in the handle breaks 2. The power supply of the sampling pump doesn’t work 3. The sampling pump doesn’t work | 1. reconnect the lead 2. Change the power supply of the sampling pump 3. Change the sampling pump |
| The sampling flow is small | 1. The mini-hole of the sampling head is jammed 2. The culture liquid in the culture dish is too much | 1. Clean the sampling head 2. Adjust the culture liquid in the culture dish to the designated position |
| Switch on the power supply and the display screen shows the irrecognizable code or the control key doesn’t work | The computer in the sampler is haltedReplace the battery | Shut off the power supply and reset again after more than 5 secondsReset the parameters |
If there are unsolvable problems, please contact the following address:
VIII. Annex
- Power supply : AC220V60Hz/DC16.8V 2A 1 piece
- Culture dish Φ90*15 2 sets
- Instrument Box 1 pieces
Recent Comments